Context #
“Processing” and “Completed” are too broad for daily work. Teams need small, visible steps to coordinate warehouse tasks, courier pickup, and customer updates. With Custom Order Status Manager you can show a clear, simple timeline everyone understands.
What is a transition? #
A transition moves the order from one status to the next (e.g., Packing → Ready for delivery).
Types:
- Manual: a user clicks to change the status.
- Automatic: a rule changes the status by event (label created, courier pickup, delivery confirmation) or time delay.
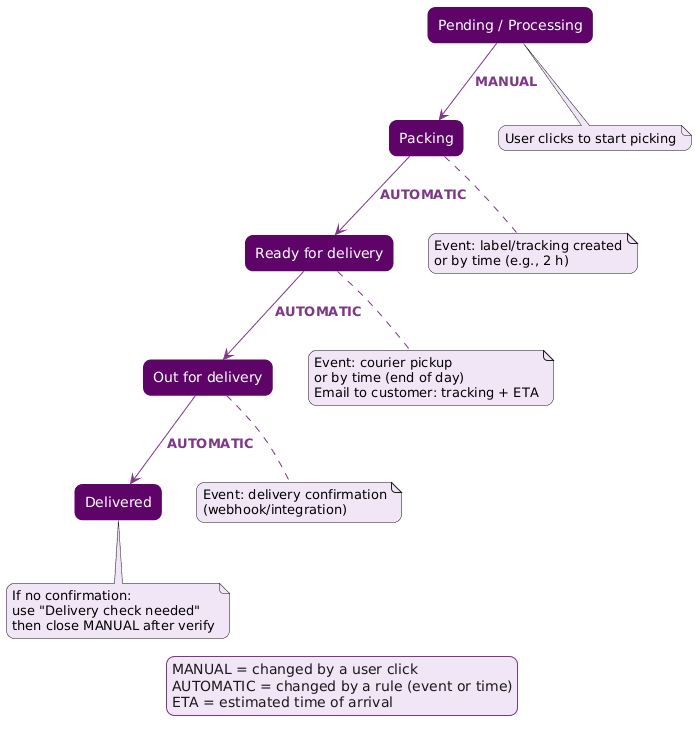
Flow at a glance #
- Processing → Packing — Manual (a staff member starts picking)
- Packing → Ready for delivery — Automatic (label/tracking event or delay)
- Ready for delivery → Out for delivery — Automatic (courier pickup event or delay)
- Out for delivery → Delivered — Automatic with delivery confirmation. If no confirmation, use Delivery check needed and close manually.

Caption: Manual kickoff, then automatic rules move the order until delivery confirmation.
What this use case achieves #
- Clear timeline on Shop and My Account: Packing → Ready → Out for delivery → Delivered
- Fewer “Where is my order?” tickets (customer sees progress)
- Smooth handoff between warehouse and courier
- Better reporting per step
Step-by-step: how it works #
- Start (Manual): move Processing → Packing when picking begins.
- Packing → Ready (Automatic): rule triggers on label/tracking created or after a delay (e.g., 2h).
- Ready → Out (Automatic): rule triggers on courier pickup or end-of-day delay.
- Out → Delivered (Automatic): rule triggers on delivery confirmation (webhook/integration).
- No confirmation? Move to Delivery check needed, then set Delivered manually after verifying.
Configure it #
1) Create or enable the statuses #
- Go to Order Status → Add New.
- Create the four statuses with clear names and icons/colors.
- Make Ready, Out, and Delivered visible to customers.
2) Place them in the flow #
- Sort: Packing → Ready for delivery → Out for delivery → Delivered.
- Allow transitions from each step to the next.
3) Add the automation rules #
- Packing → Ready for delivery
- Condition = Event: label/tracking created, or
- Time-based: after 2 hours.
- Ready for delivery → Out for delivery
- Condition = Event: courier pickup, or
- Time-based: end-of-day.
- Out for delivery → Delivered
- Condition = Event: delivery confirmed (webhook/integration).
- If no confirmation: move to Delivery check needed and close manually after verification.
Emails (recommended) #
- Packing: “We’re preparing your order.”
- Ready for delivery: include tracking link and ETA (estimated time of arrival).
- Out for delivery: “It’s arriving today.”
- Delivered: confirmation + quick feedback link.
Daily operation #
- Bulk-move new paid orders to Packing (one manual click).
- Label creation pushes to Ready.
- Courier pickup advances to Out.
- Delivery confirmation sets Delivered.
Troubleshooting #
- Stuck in Processing: remember, the first transition is manual.
- Skipped steps: check conflicting rules/webhooks.
- No emails: verify each status email and SMTP deliverability.
Metrics to watch #
- Time in Packing, Ready, Out
- On-time delivery rate
- WISMO tickets per 100 orders