
Activating the license for any BrightPlugins is essential to access all premium features, receive updates, and get technical support. This guide will show you how to easily activate your license.
Step-by-Step Guide to Activating the License for BrightPlugins
Step 1: Access the Admin Panel
- Log in to your WordPress admin panel.
- Navigate to BrightPlugins Settings in the sidebar menu.
Step 2: Go to the License Section
- Within the BrightPlugins settings page, select the License option.
- This will take you to the section where you can manage the plugin’s license.
Step 3: Enter the License Key
- In the License section, you will see a field labeled License Key.
- Enter the license key you received when you purchased the plugin into the License Key field. This key is usually sent via email or accessible in your account on the website where you purchased the plugin.
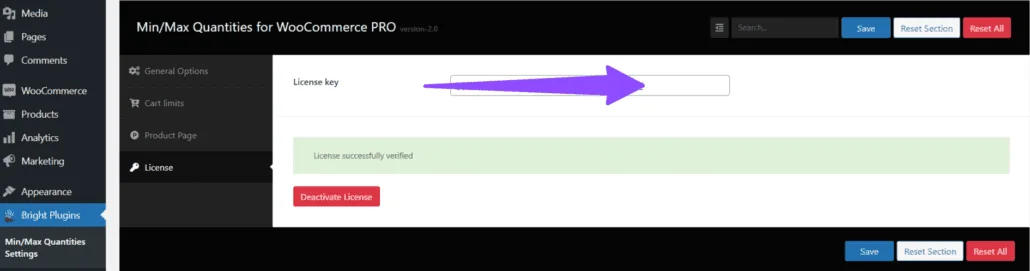
Step 4: Save the License
- After entering the license key, click the Save button to activate the license.
Step 5: Verify Activation
- If the license key is valid, you should see a message indicating that the license was successfully verified.
- At this point, the plugin license will be activated, and you can access all premium features and technical support.
Step 6: Deactivate the License (Optional)
- If you need to deactivate the license at any point, you can do so from the same License section.
- Simply click the Deactivate License button to proceed.
Additional Tips and Troubleshooting
Double-Check Your License Key
- Ensure that you are entering the license key exactly as it appears in the email or on the website. License keys are case-sensitive and must be entered without any extra spaces or characters.
Confirm Activation
- To confirm that the license has been activated correctly, navigate back to the License tab.
- You should see the message License successfully verified, confirming that the license is active.
Where Is my license key or order ID?>
Updated on April 16, 2026 · Need help? Open a support ticket