How to Add Additional User Profile Fields in WordPress Registration
How to Add Additional User Profile Fields in WordPress? You never get a second chance to make the best first impression possible. WordPress website owners should be all too aware of this fact. That’s particularly true when you’re trying to gather information about people visiting your site. Gathering information is important because it can help you generate leads and convert a visitor into a regular user or even a buying customer.
WordPress does offer you some standard fields when users register on your site. But what if you want to add more? You might want to grab users:
- Social media profiles
- Phone numbers
- Interests
- How they found your website
This is going to allow you to create an awesome custom user profile. Below you’ll discover info on the key ways to add additional user profile fields to your website registration.
Why Are Additional User Profile Fields Important?
Collecting more information from your users will ensure that you can personalize the service that you provide in the right way. You’ll be able to know more about your audience. You can then pinpoint what products or services will be of most interest to them. Regardless of what information you collect, it would help if you were transparent about using this info.
Now, let’s explore key ways to boost the number of profile fields in your WordPress registration.
Using Cimy User Extra Fields
Most of the options we’re going to discuss here include the use of plugins. To add plugins to your WordPress site, you need to explore your dash.
Here, you’ll find a section specifically for Plugins. You can then select the Add New option on the left-hand side. You can search for various plugins here. The first one we’re going to recommend is Cimy User Extra Fields.
Once you click Install Now, you’ll be able to activate the plugin so you can use it. You can then access the main settings of the plugin.
This plugin provides numerous settings for you to explore. It provides a list of all the different default fields. You can choose which ones to make visible. Don’t forget, some of the defaults may not be relevant for your particular business.
To add new fields, you need to scroll to the bottom of the settings. Here you’ll find the Add A New Field section.
You must make sure that you:
- Select a type for the new field
- Customize what it does
- Select to add it to the registration
Remember, bigger is not always better. You don’t want to sift through hundreds of words that are useless. That’s why you should select to limit the characters for each field.
After you have added a field, you will be able to edit it whenever you want. If you make any changes to the Extra Fields section, make sure that you always click Update Field. You can also use the Delete Field button to start fresh with your site.
Once you have used this Plugin, be sure to test it immediately. If it isn’t providing the right results, there are other options.
Use Profile Extra Fields
You can follow the same process that we went through above to add this alternative plugin to your WordPress site. Once you have installed and activated the plugin, you can immediately add additional fields to your registration form.
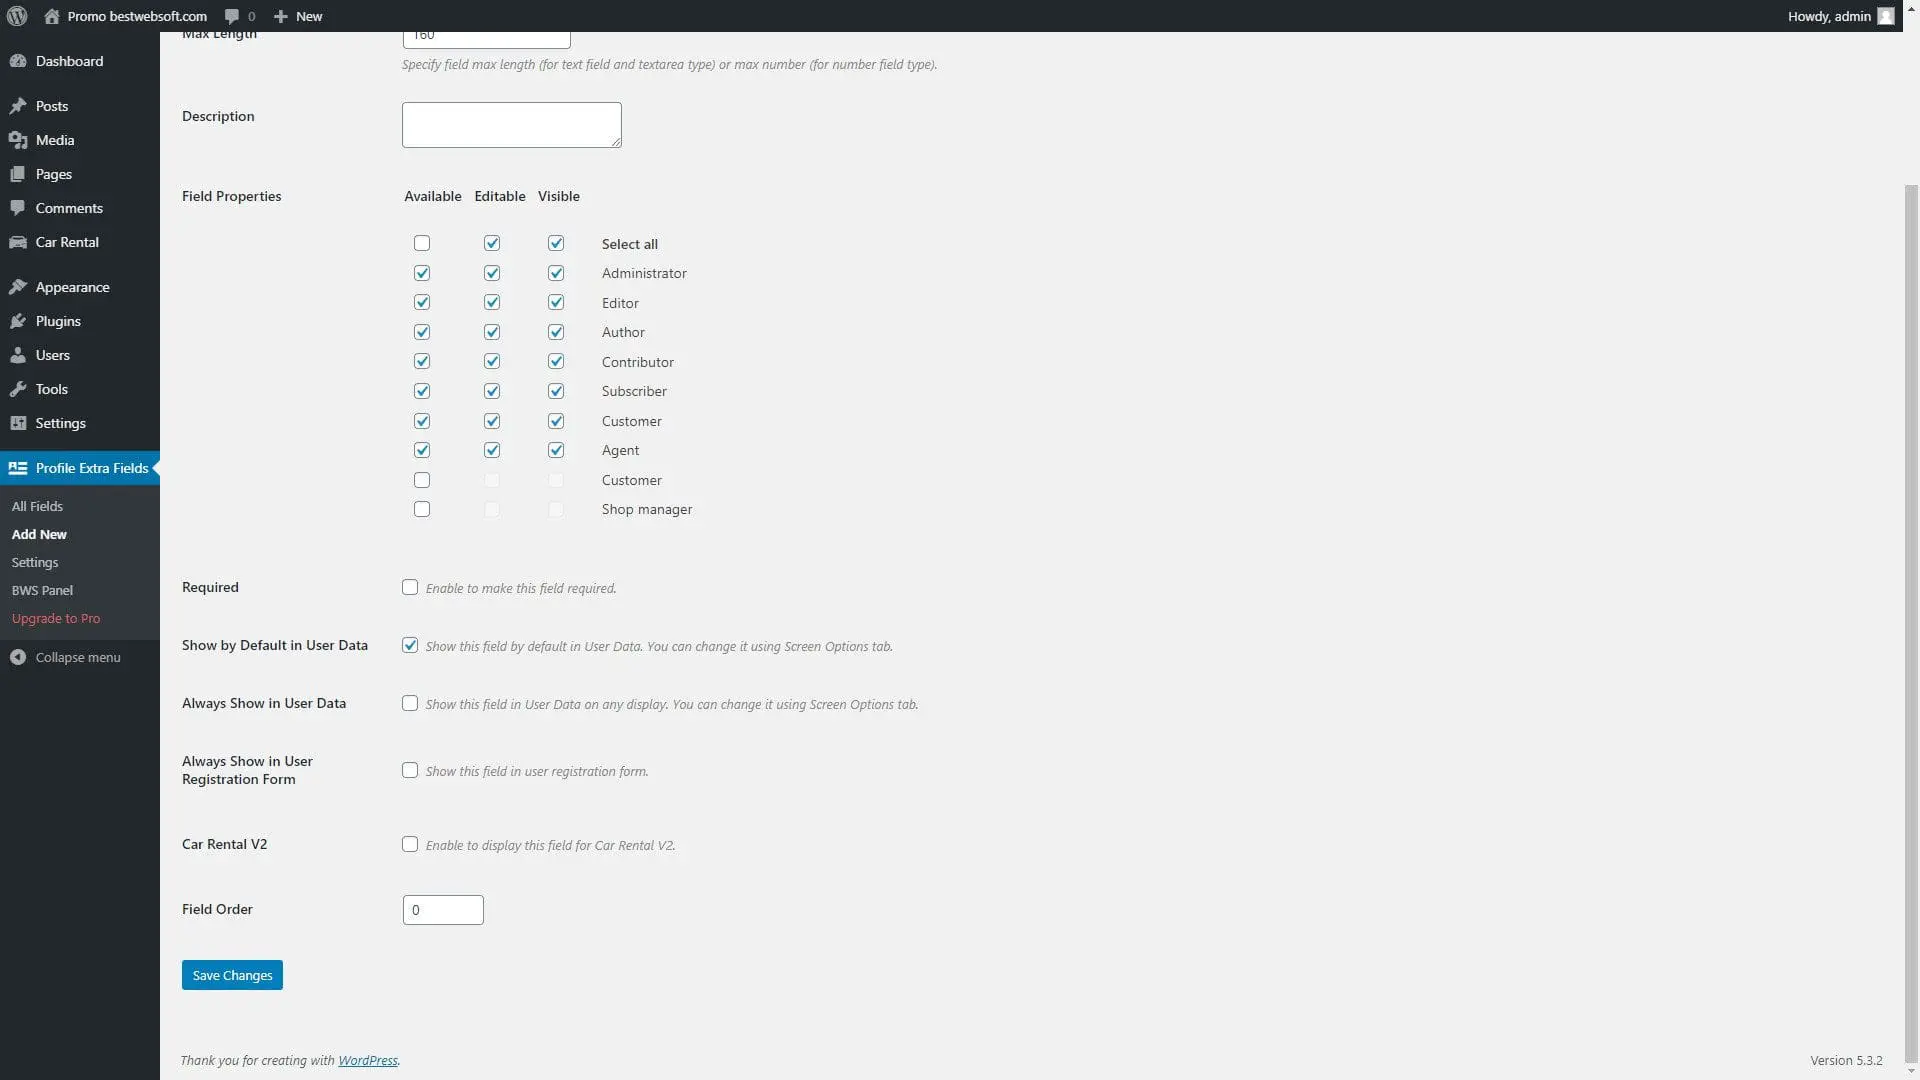
To do this, go to the Profile Extra Fields section. Then click Add New. You then need to decide what type of field you want to add. You’ll have a few boxes to fill in, such as the:
- Name
- Type
- Pattern
- Description
You have a few other key options too. For instance, you can choose whether filing this in will be required for users. You must remember to select ‘Always Show In User Registration Form’ if you want this option to appear.
All the new fields you add will be available on your ‘Add New Page’ in the plugin. As such, you will be able to alternate which ones are viewable.
Once you have added the new fields you want to your site, it’s important to ensure anyone can register. It’s easy to do this by accessing your WordPress site, clicking Settings, and selecting the General tab. You can then tick the box so that anyone will be able to register.
This ensures that the new fields you have chosen will appear. Profile Extra Fields can be used to add a wide range of different fields to your WordPress registration. However, there are more flexible methods available.
Advanced Custom Fields
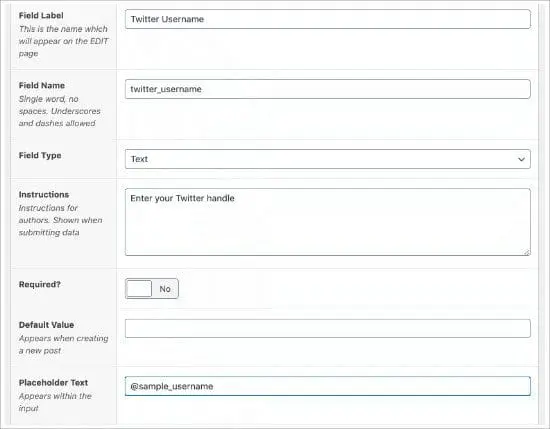
Again, you can add the Advanced Custom Fields plugin using the process we have already discussed when activated, hit Custom Fields, and then select Add New.
Similar to the other plugins, you’ll have a few sections to fill in, including:
- Field Label
- Field Name
- Field Type
- Instructions
- Required
- Default Value
- Placement Text
Most of these will be self-explanatory. However, the field label is important. It will help keep your different fields organized so that they are easier to access and use.
This plugin provides you with options to gain countless different types of information, including:
- Text
- Password
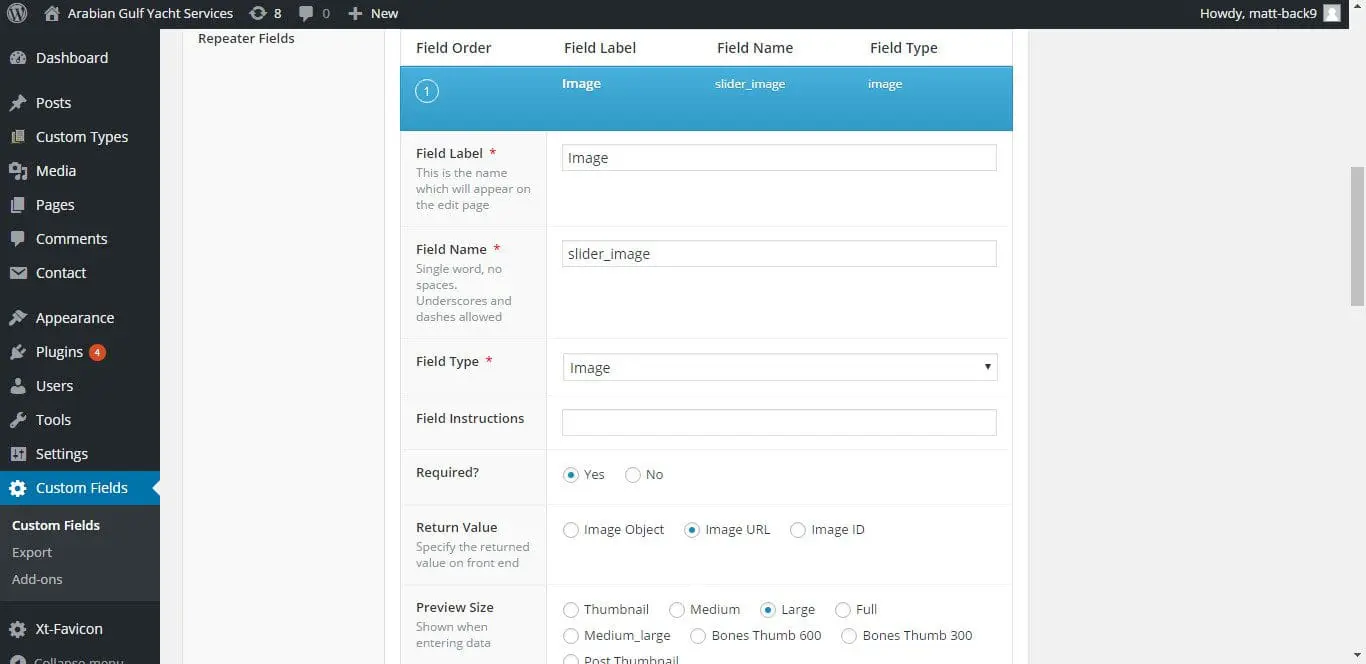
You can also choose where you want the field to appear. To do this, scroll down to Location and hit User Role.
Here, you can choose whether this field applies to all those who register or only to certain users.
Once you are happy with the field you have created, you can then choose to publish it immediately.
There are different style options to choose from. Seamless is one of the best. This ensures that the name of the field won’t appear on the registration page.
With this plugin, you will still be able to see all the fields you have added. You need to select Custom Fields and then go to Field Groups.
Remember, you can check how your registration page appears at any time. To do this, you need to access the default URL: yoursite.com/wp-login.php?action=register.
ProfileGrid – How to Add Additional User Profile Fields in WordPress
Another possibility to explore would be using ProfileGrid. This is useful as it does provide a list of default shortcodes. It keeps things simple and ensures that you won’t waste countless hours playing with different settings.
As with all the other plugins, you need to activate it on your WordPress site first. Once you have done this, you can access the plugin and explore a page called Group Manager.
Once you have done that, select Add New from the top left corner. You can then start to add additional profile fields.
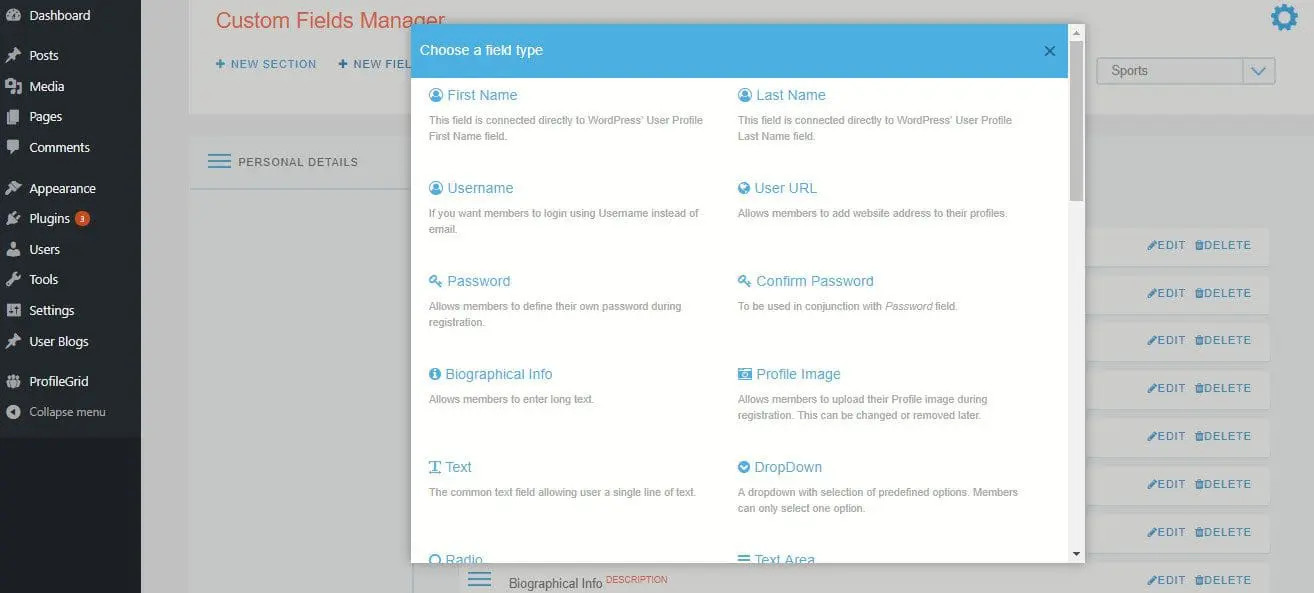
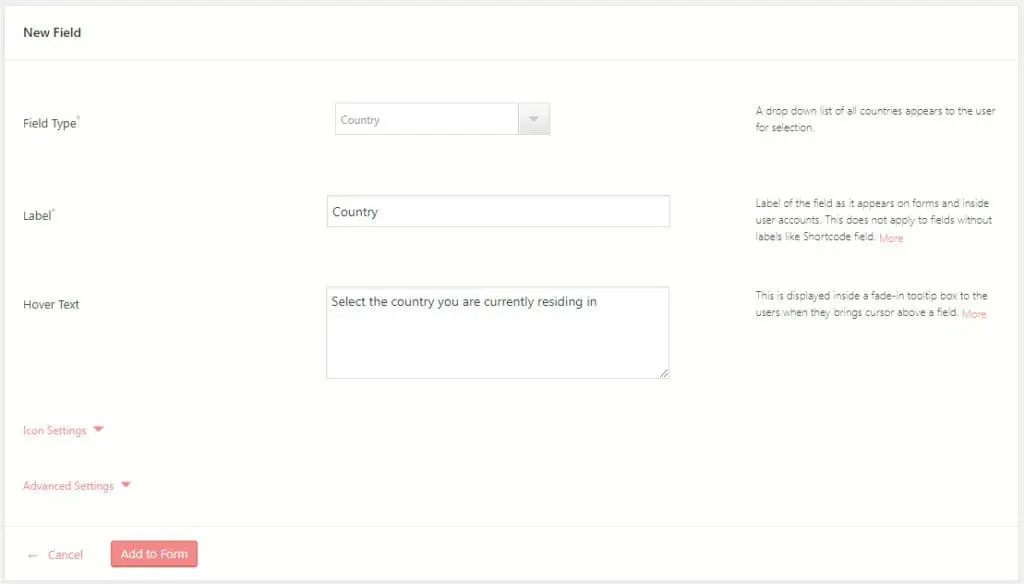
Click on Fields, and you will then be able to select New Field. This is going to provide you a range of choices for your different fields.
You’ll have a few different types to choose from, including:
- Biographical info
- Text
- User URL
- Last name
- Profile image
When you have selected all the fields, you can then move to the registration page. When you use ProfileGrid, you’ll be able to access numerous default pages. This does include PM Registration. As such, you won’t have to paste the shortcode.
Instead, you can navigate to that particular page and paste the shortcode in. You then need to add the ID, which will be a number, and select Publish. This is going to add different fields to your page.
Through ProfileGride, you can also assign the registration page. You can do this through the plugin under the Global Setting Tag when you select General. This will provide you with a page where you can customize and adapt the registration page’s front end.
RegistrationMagic
Or, finally, you might want to think about adding additional fields using RegistrationMagic. This is a freemium plugin and can be installed exactly like the others that we have discussed.
With RegistrationMagic, you can add a new information table to the default WordPress user’s pages. Each table row then corresponds with the different form submission. As such, you can attach various form entries to a single page.
To use this feature, you need to open RegistrationMagic in your dash. You can then hover above the form card to add different fields with user meta. When you click the add field, this is going to open a brand new page.
You’ll be able to select the different fields from the popup. There are countless choices to explore here, including unique options like secondary email and nickname.
You can explore even more choices by opening the Advanced Setting tab. Once you have explored the different field options, you can select Add Field to WordPress User Profile.
Something to be aware of here is that RegistrationMagic does provide a built-in system for displaying form data on the front end. However, if you are eager to convert it into a full membership system, you will need to use it in conjunction with ProfileGrid.
Find Out More – How to Add Additional User Profile Fields in WordPress
It’s clear then that there are countless options when you are adding additional user profile fields to your WordPress registration page. It all starts with finding the right plugin, and this process can be confusing. If you need further assistance, our experts at Bright Vessel can help. We’ll craft the perfect registration page and ensure you get the information needed.
We are Bright Plugins
Bright Plugins team is made up of full-stack developers which have been certified in WordPress and WooCommerce. We provide best-in-class plugins for store owners, agencies, and professionals.
